I'm continuing on my pledge to reduce my stash of paper and reject prints (as seen in my previous posts).
My latest artist book was inspired by a 2019 BioBlitz that I was selected to participate at as a creative researcher. This is where I met Entomologists who were studying dung beetles. Previously I only thought dung beetles existed in Africa (I saw it on TV once) but I soon learnt that Australia has its own native dung beetles, and they are so fascinating!
Dr Kathy Ebert (an Entomologist) working in the lab analysing beetles collected in the field studies
Out in the rainforest with the Entomologists. It was a bit wet, lots of leeches, but I'm still smiling!
Here I am drawing insects collected, using a magnifying lamp to see the detail.
The artist book I have made is titled "Advice from a Dung Beetle". The idea started with a poem that I wrote and a lithographic drawing of a dung beetle based on some sketches I did at the BioBlitz.
The design for the book started with an online video tutorial by Helen Hiebert. Its a simple design for a tunnel effect in a concertina format. The idea of the book is that you have to look through the layers of foliage to see the dung beetle, with the poem narrating the activities and life cycle of the beetle.
Here is the poem:
This is the mockup design based on Helen Hiebert's tutorial
The closed book - the cover is a piece of thick handmade botanical paper, with a scrap print on the front (featuring a gelatine print with lithograph beetle print). The slip band is a piece of kraft card with a gelatine print fragment and digital text. The book is approx A6 size, so produces an intimate viewing experience.
Looking through the book. The imagery features leaves, and has been created using gelatine prints, drawing and painting. The cuts out give peep holes into the layers beyond, like layers of leaves on the forest floor.
A view of the book in its entirety. There is a dung beetle print on the inside of the back cover that can't be seen in this view.
Another view looking down the 'tunnel', the view getting narrower as you look through the book. I love the layering of colours, the greens and the blues.
I'm continuing on my pledge to reduce my stash of reject prints (as seen in my previous posts).
My latest artist book was inspired by my love of pollinators and native bees. A couple of years ago during experiments with polyester plate lithography, I created a bee drawing using crayon onto a litho plate. I wasn't real happy with the image, so I printed off a few test prints and never used them. Hence they ended up in my stash.
Recently I was re-introduced to a Winged Book structure. I remembered that a few years ago I had made a model based on instructions from Alisa Golden's wonderful book 'Making Handmade Books'.
So began the idea of my 'The Buzz of Bees' artist book. As well as prints, the book features a short piece of my writing 'The buzz of bees is the melody of the garden'. I wanted a positive message in my book, perhaps to offset all the negativity of recent world events. I used traditional letraset, the action of rubbing on the text is a cathartic experience as well as justifying my growing stash of letraset templates....!
Below are some photographs of the completed book and a discussion of my thought processes. Enjoy!
The model book I had made. Very useful to refer to when making my artist books.
'The Buzz of Bees' closed with slip-band
The book open. There are 2 panels of bee prints and the hexagon patterns were made using hexagon stencils and gelatine monoprinting. Simple repetitive printing, and I used a paper mask so I didn't print over the bee images.
I think that the 3D geometric structure of the concertina with the 'wings' describes the movement of the bee in and out of the hive. You can almost here the buzz in the air as the bees go about their daily routines.
The concertina is made up of square papers, joined at the 'wings'. The difference between the model and my book is that I didn't fold down the top of each square. The bottom is folded up, with the reverse side showing, that's where the text is.
Covid-19 restrictions on gatherings have eased in Queensland, for a while perhaps, so I'm finally able to offer face-to-face workshops again. I'm so grateful for the opportunity to get back into running workshops in this 'new normal' world of hand sanitiser and social distancing.
I'm currently facilitating a series of 'Mixed Media Nature Sketchbook' workshops, combining gelatine plate monoprinting with drawing and watercolours in a concertina format. Its a technique I've developed to combine my love of printmaking with the intimacy of sketching. My books are always centered on a personal experience of place, usually involved with travel to national parks or coastal areas.
The following photos highlight the results of two of my recent workshops, I hope you enjoy the imagery as much as my workshop participants did!
My work, a workshop demonstration
My work, scribbly gum inspired, workshop demonstration
Student work, I love the watercolour work on this one. Viridian green can be hard to work with, but it really makes the work pop
Student work, guess what her favourite colours are! I love seeing colour combinations that are so different to my own.
Student work, in progress. This book was inspired by wattle trees.
Student work, wonderful to see them all at the end of the workshop!
Beautiful work girls! A lovely day out for a group of like-minded friends.
How's your lockdown/stay-at-home time going? I'm continuing with my self-residency @ home daydream.....
Since I 'returned' from my virtual lithographic residency in the mountain rainforest (see last week's POST), I've been lurking around tidal zones amongst the mangroves and mud. It's a favourite place of mine, with lots of childhood memories associated with it.
We've been out on our kayaks a couple of times in the past week, luckily kayaking for fitness is allowed under the lockdown laws!
So this week at my self-residency @ home I decided to finish off a project. It was intended for an exhibition in June, but that has of course been postponed, but its time I resolved the artwork.
To get you in the mood and so you can fully appreciate my headspace in this week's residency project, here's a short video of me out on the water in my kayak. It might give you a feel of the moment I'm blissfully just floating along listening to the birds. If the video doesn't play via your email feed, you can view it directly on my BLOG or Instagram feed.
The work I completed this week is some 3D sculptures of mangrove seeds. I wanted to have larger-than-life seeds to hang on the wall, featuring monoprints using leaves from the tidal zones. The scultpures will sit alongside some other works on paper that I started in this blog HERE.
So my first step was to print lots of monoprints on lightweight papers, such as tissue and japanese kozo. Its great fun and freeing to randomly print without worrying about composition. I used my oil-based inks and my Xcut press for maximum colour and detail. Here are a few samples:
The next step was to make the mangrove seeds. I created wire and paper frameworks then covered them in a product called Paper Magiclay. Its a lovely soft flexible product that air dries. It was a fun process recreating my large seed models based on the shapes of actual seed pods. I inserted small loops of wire on the back so the seeds can seamlessly hang on the wall, like they're floating.
I then tore my prints into small pieces and glued them onto the paper seeds, in a paper mache-like style. I used a mixture of Yamanto japanese glue and PVA. I painted the seed tips with acrylic paint and I also printed using my gelatine plate over the top in sections to add some more detail. More is better!
In progress
The final step this week was to apply encaustic wax, to seal the work and give it a rich dimensional look. This is a 2 step process - applying liquid wax then fixing it with a heat gun. Drippy, messy fun!
I melt my wax in tins in a skillet filled with water, on a low heat
setting. I use unrefined beeswax that I source from farmers markets.
Applying heat to the wax melts it into the paper
and makes it transparent.
The end result is some interesting representations of the mangrove seed. I like the layers of prints using leaves from the tidal zones on top of the seed structure, as a kind of representation of the connection of the different elements from the tidal zone.
I'm happy with the completed works, hopefully they will get selected and exhibited when the galleries are open again. In the meantime, they'll hang on my wall, assuming I manage to find a spot amongst all the other artworks!
The finished works.
The longest one measures 64cm.
I'm often revisiting old prints and cutting them up, to remake the prints into artist books etc. I find many forgotten treasures in my stash, each an opportunity to breathe new life into prints that sadly have been rejected as they're just not good enough for framing.
Last month, I was lucky enough to spend some time gallery sitting in Sydney. I needed to take something to work on, but I didn't want to take my kit for printing. I was thinking 'don't take too much stuff'....well, I still took too much stuff but I did achieve a goal of reworking prints into an artist book.
The prints were part of a series of monoprints that I did a couple of years ago for a hospital commission. There was nothing wrong with the unused prints, they just weren't the best ones.
I had seen an artist book on Pinterest and had been contemplating it for a while. I couldn't quite figure it out so I called on a fellow book artist to help me and she whipped up a sample pretty quickly (to my embarrassment!). Anyway..... that gave me the final motivation to make a book using the format.
Its a concertina book, displayed like a carousel book. It has a folded cutout in the valley folds, revealing an 'inner circle'. My prints were one-sided so I coloured the part that would show on the inside through the popout with loose gelatine prints, thus countering the hardness of the white paper and giving the viewer something interesting to look at as they peer through the cutouts.
After attaching covers and a tie using found string, the book is fully resolved. I'm pretty pleased with it. I'll probably use it as a sample to create another one using a different set of prints, next time I want the imagery of the prints to link to the format of the book.
Tick, cross that one off the list! Onto the next project....
The basic fold and cut to create the pop outs. The concertina structure is made up of multiple sections, each having this fold & cut in the valley fold.
The concertina book showing the pop outs on the prints
The reverse side after the gelatine printing
Clipping the book together before glueing to check it all works (generally a good idea!)
The completed book with covers tied together, so it becomes a carousel type structure.
The book closed, revealing the triangular structure. Nice!
A sexy viewpoint...i love those seductive folds!
A different view, with the book open lying on its covers. Playing around with display the finished book gives me more ideas how I could use this structure again.
During my recent trip to Curtin Springs Cattle Station in Central Australia, which I posted about here, I also completed a mixed media concertina sketchbook about my experiences.
My sketchbooks are not like travel diaries or nature journals, as they don't contain detailed sketches, perspective-accurate drawings or volumes of text.
My sketchbooks are a chaotic mix of monoprinting, tracings, painting, and scribbles. I like to think I am responding directly to what I am seeing and feeling, looking at pattern and repetition in the landscape, and generally just being loose and free with my creativeness. This kind of approach ensures I don't worry when something doesn't look perfect, and I don't feel guilty when I use a bit of 'artistic licence' to interpret something my way.
I like to work plen-air, sketching loosely from a 3 dimensional object rather than a photograph - I think this truly captures 'the moment' on the page. Of course, photographs are useful for later, to add a touch of colour or other details not recorded at the time of drawing.
Below are some photographs of the concertina book I completed at Curtin Springs. I used a variety of objects to create the imagery in my book.
Plants and grasses were used for gelli plate monoprinting and drawing from. I also drew seed pods. The colours were inspired by the landscape. I also used a stick to do some sepia ink drawings - a great way to loosen things up! I use a variety of waterproof pens, from 0.05 to 0.8, and also a pen with a brush nib. Water brushes with my watercolours also provide colour content.
It took me 6 days to complete my book on site. I finished it off at home with a cover made from paper made from Curtin Springs grasses and a platted fibre tie.
If you're in the Sydney area and are interested in learning how to make this kind of book, I'll be running a workshop on 14 October at Me Artspace, St Leonards. For more information and bookings, click HERE.
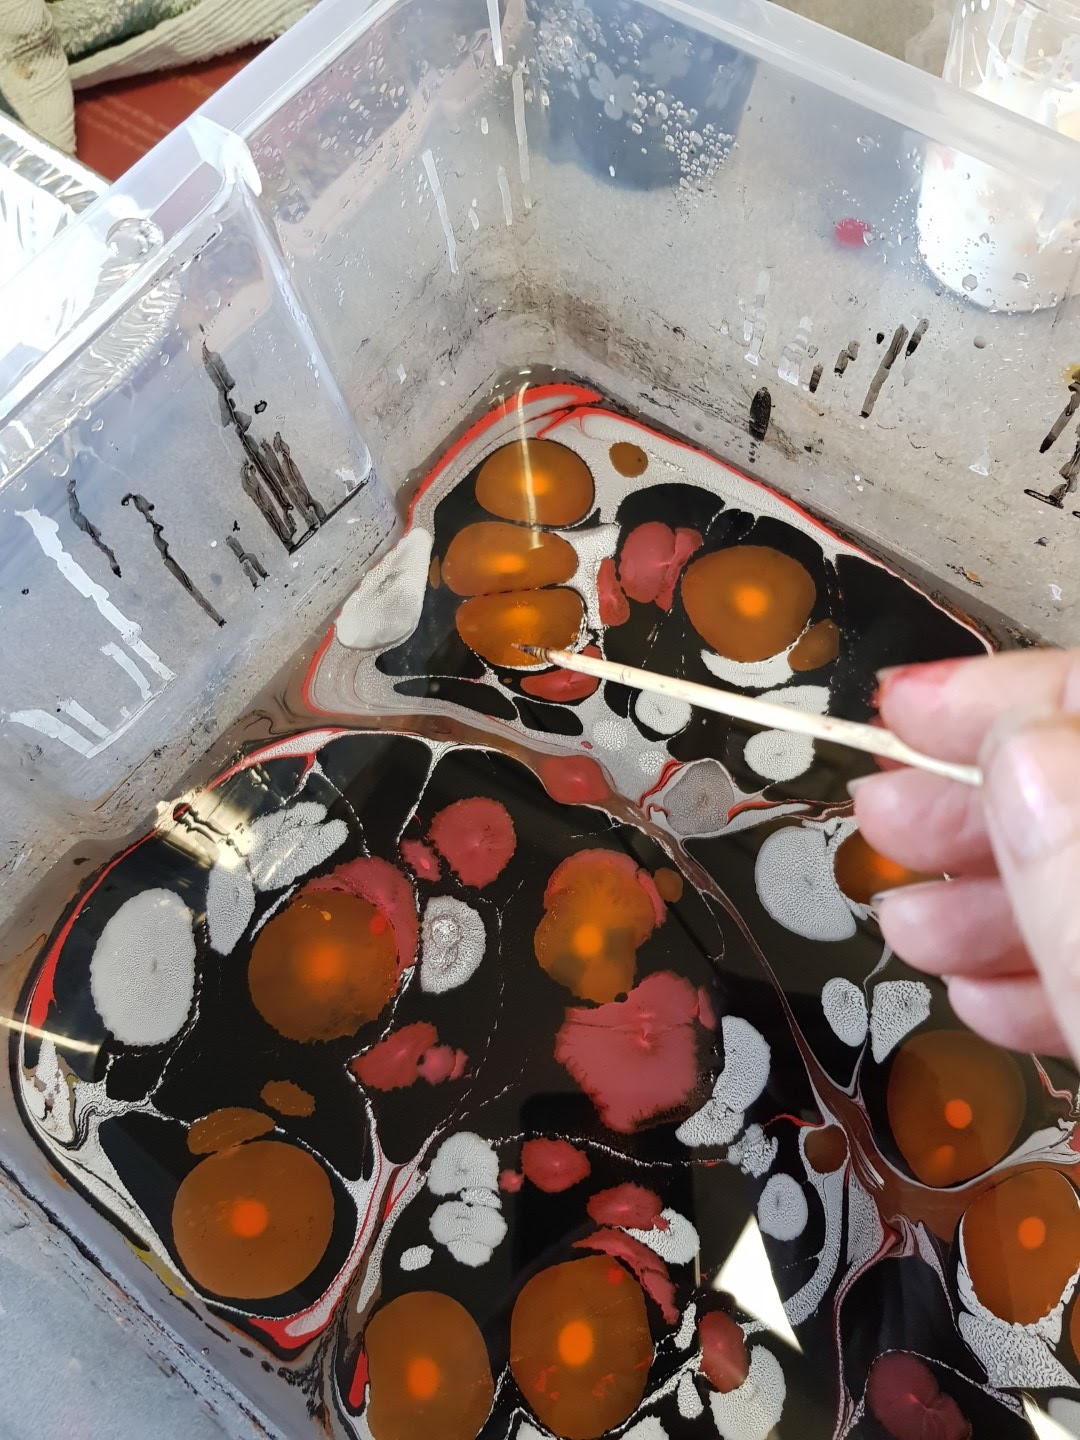
I recently attended a workshop doing experimental marbling, Turkish style, by artist Bronwyn Rayner (instagram raynbowcrowstudios).
Although marbling is not part of my usual art practice, it was great fun and very relaxing. A bit like gelatine monoprinting but more freeform and delicate. I did lots of prints on paper as well as marbling 3D objects like fans, pots, and rocks.
I also managed to marble lots of japanese papers like kozo and book pages - these lighter weight papers will be perfect to use for chine colle with my drypoints.
Bronwyn showing me how to marble a fan - harder than it looks!
Lightly pressing the fan onto the marbled surface.
The completed fan - I'm all sorted for summer now!
We marbled leaves as well - gorgeous!
Using a pipette to drop the colour. I love the circular organic shapes at this stage.
Using a wooden skewer to create a design. This is the really fun bit!
I love big swirls and drops, rather than fine designs.
Lifting the marbled paper out of the tray - so exciting (and wet)!
One of my favourites - marbled paper from a Japanese book