Thursday, May 7, 2015

Buzzing with drypoint and monoprinting

In my studio I recently created a drypoint plate of a bee, using a piece of smooth plastic and an etching needle.  Drypoint is a form of intaglio printmaking, where the ink is forced into an etched line and then printed.

This is my drypoint plate and my etching tool which
I used to draw the lines into the plastic.

This is one of my first test prints.
 I've hand coloured it with gold ink.
I printed my bee drypoint plate several times (called an 'edition'), reinking between prints. I then used my Gelli-Arts Printing Plate to create a monoprint background, using gold and brown acrylic paint with a stencil and paper circles.  I made a paper silhouette of the bee image which I held over the drypoint print when monoprinting, so it wouldn't get printed over.


My chicken wire stencil, which looks like honeycomb
when printed.  The stencil is made of plastic not wire, so it
doesn't damage the gelli plate.

You can see from the images below that each print becomes a one-of-a-kind artwork even though the drypoint bee image is repeated in each one.

With the monoprint in the background, I was aiming for an impression of a hive. In some prints the paint is a lot brighter and the imagery sharper than in others.  And that's what I love about monoprinting - no two prints are ever the same.


Saturday, April 4, 2015

Indigo Blue

Last weekend I had the rare luxury of participating in an Indigo dyeing workshop, held on the Sunshine Coast with textile artist Jenai Hooke.

The indigo dye process is a very natural organic experience, where the dye vats are treated with reverence as living things, and care must be taken not to unbalance the indigo brew.  Its a slow dyeing process from preparation of the vats, washing and mordanting the fabric, manipulating the fabric with stitches, knots and folds, then the dyeing and post-dye treatments - rinsing, washing and setting.

It was a pleasurable process in a peaceful country setting with friends and gorgeous alpacas.  And being the paper-obsessed person that I am, I was able to dye some paper as well.

Happy times!


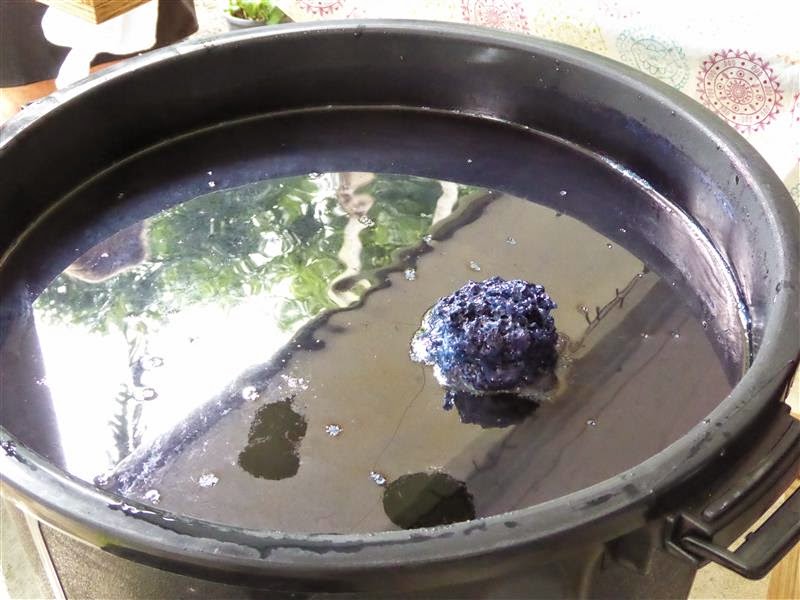
The Indigo Vat, complete with the indigo 'flower'
which indicates a healthy vat

Jenai and Nicky unravelling Nicky's scarf
after dipping in the vat, oxygenating the fabric so the
dye turns its wonderful blue colour

This is a t-shirt I concertina folded then bound.
This photo shows it after a dip in the indigo vat.
The finished t-shirt, the top of it was dyed without folding.
I love the pattern the bundling created.
Easy for me too as it didn't involve stitching!
A close-up of the bundling pattern, you can
see the string marks.
 
Dyeing some paper

The paper drying, the bubbles from the surface of the vat
created beautiful patterns.  I'll print onto these.
A silk scarf that I indigo dyed over top of
some eco-dyeing that I did.
The circle patterns were made with glass beads
 and chick peas secured with rubber bands.

Everyone admiring our combined indigo handiwork.
 
And the Alpacas - the little brown one was born
whilst we did the workshop.  Too cute!


Monday, March 23, 2015

Banksias and Birds

My art friend Catherine Money and I are embarking on a collaborative partnership that intends to open us up to the notion that everything in nature is interconnected.  Catherine gave me a wonderful quote that will form part of our work ethic:

'Nature speaks softly...you have to listen quietly'  M. Millen

As part of this project we are holding an exhibition of works at Hanasho Florist in West End in July, then for a week in August we are setting up an Artist-in-Residence and Exhibition at Maroochy Bushland Botanic Gardens.

For the Hanasho exhibition, I'm currently working on a series of monoprints focusing on birds and the banksias they feed on.  I've been exploring a technique where my first print in a series is a 'set-up' print.  This means that I'm using the ink on the plate to ink up my objects rather than exclusively manually ink them myself.  The first print is printed onto cartridge and is not a resolved print in any way.  It could form the basis of a collage though, as my mantra is 'Nothing is ever wasted!'.


This is the first print, the 'set up'.
Layering the objects assists in developing
interesting textures and marks on other objects.
White space is normally avoided but
I don't have to worry in this process.

One of the resulting prints.  It features
Coastal Banksia leaves and imagery of
New Holland Honeyeaters in mid flight.

Prints using WA banksia leaves and
imagery of the Little Wattlebird

I've also been having fun with circles and some
thready fibre stuff I bought at the junk shop.
You never know where you can find cool
stuff to print with.

Blue and brown - my favourite colours!
The word 'camouflage' comes to mind
with this print.


Tuesday, March 10, 2015

Monoprinting Workshops

Magical Monoprinting
Date:  Saturday 21 March 2015
Time: 10am - 4pm
Cost: $90 (includes all materials)
Location:  BVAC Hub, Wellers Road, Tarragindi
Enquiries & Bookings: sandy_p09@hotmail.com or Sandra 0419 028 133
4 places left! 

Explore the printmaking technique of monoprinting using plants, stencils and other found materials to create one-of-a-kind and often unexpected images.   We'll be using artist quality etching inks and my etching press to work our creative magic. This workshop is designed for beginners, 'non-artists', or those new to this type of monoprinting.  No previous printmaking experience required.

i love ginkgo! monoprint
Studio Time - Monoprinting
Date:  Sunday 22 March 2015
Time: 10am - 4pm
Cost: $40
Location:  BVAC Hub, Wellers Road, Tarragindi
Enquiries & Bookings: sandy_p09@hotmail.com or Sandra 0419 028 133
1 place left!  Maximum of 6.

This day is designed for those who have already participated in a monoprinting workshop with me and who would like some studio time with an etching press to work on their own monoprinting projects.
This is not a workshop but some guidance will be available after a short introduction. Numbers are limited to 6 to ensure everyone gets quality printing time. You'll be able to work independently but still have group interaction and shared enthusiasm.
The cost for the day is $40 - this covers my hall hire costs, use of my inks, plates, basic papers, and other consumables.  You need to BYO your apron, lunch, any printmaking papers you want to use and any objects (leaves, stencils etc) you want to print with.  
I'll have available Fabriano printmaking paper (slight marks/foxing around the edges) for $5 per large sheet.  Great value for monoprinting/collage etc experiments.


The simple beauty of a leaf and some fibre in a monoprint

ginkgo again, I'll have to find another tree to
top up my stash!

Friday, March 6, 2015

Monoprinting and Eco-Dyeing Together

Some of my latest projects have involved dyeing t-shirts and other wearables.  Over the Christmas break I had sun printing some shirts, but this time I tried monoprinting in conjunction with eco-dyeing.

I bought some cotton t-shirts and singlets from a major retailer and pre-washed them to get rid of any manufacturing residues.  I then inked up some leaves using my oil-based etching inks and printed them onto the shirts using my etching press 'Thumper'.  After air drying I put them into the dryer for a bit  of 'heat' setting, though I'm not sure if this was necessary.  I then did my eco-dyeing using leaves collected from my recent camping trip to Northern NSW, having pre-mordanted (ie soaked and dried without rinsing) the shirts in soy milk.

I'm happy with the results, particularly as I didn't need special fabric paints or additives for the etching ink.

During the printing and dyeing process I also worked with some Nepalese handmade paper to make some lovely notebooks.  Heaps of fun!

Two of the completed shirts, monoprinted and ecodyed.

The singlets, monoprinted and ecodyed.

A leaf with metal objects and the subsequent print from the dyepot.

I love how this leaf has been embossed from a metal object in the dyepot.

Some of my notebooks, with monoprinting and ecodyeing.

The detail of a fern monoprint, with ecodyeing providing colour
and interest in the background.


Sunday, February 1, 2015

PASSAGE - exhibition of porcelain and paper

Introducing my latest exhibition....

PASSAGE
Artists Pattie Murray and Sandra Pearce
a journey through the intertidal zone - past and present

'PASSAGE' is a joint exhibition with porcelain artist Pattie Murray, where we journey through the intertidal zones, exploring past and present through the mediums of paper, porcelain and natural fibres.

My work for this exhibition includes sculptural works featuring papermaking and printmaking to describe my journey exploring past experiences of camping and fishing in Moreton Bay. I've used my memories to connect my current art practice to the mangroves, mud flats and sand of local areas such as Cabbage Tree Creek and Moreton Island.

Location: Redlands Art Gallery, Capalaba
Open until 14 March
http://www.redland.qld.gov.au/RecreationFacilities/RedlandArtGallery/Pages/default.aspx


'Washed up' - a collaborative installation,
featuring handmade botanical paper, toilet tissue, and porcelain objects.
This work is a comment on debris brought into shore with the tides.


'Drift' - Monoprints on Silk Paper,
featuring monoprints of mangrove leaves and other coastal debris.
I made the silk paper with gummy silk cocoons
then monoprinted the 3m long piece of silk paper, 50cm at a time,
with Thumper my portable etching press.
A challenge but the piece certainly makes the impact
I was looking for.

Detail of 'Drift'.
'Exposed' - handmade botanical paper of mulberry bark and eco-dyed silk thread.
This work evokes the memories of walking along tidal mud flats at Nudgee Beach.

A view of the PASSAGE exhibition,
with some of Pattie's beautiful porcelain vessels in the foreground.

Friday, January 23, 2015

Birds in Print

Last week, as part of a group exhibition themed on birds, I ran a couple of workshops including one focusing on creating relief printing blocks using the Ezy-Carve product.  This is a white rubber block, much like eraser material, that acts like lino but much easier to carve.  Its soft and thick, and very forgiving.

Each student in my workshop had an A6 size block to work with and a set of simple lino tools comprising 2 'v' shaped tools and one 'u' shaped tool.

The designs were based on birds to reflect the theme of the exhibition.  Everyone produced very creative work.  Some carved in a very free and loose manner, creating imagery consisting of fluid lines and movement.  Others concentrated on detailed designs for a more realistic image.

After carving and printing the blocks, the second part of the workshop was a couple of hours of printing and play with paint, what I called 'Feathered Friends Art Frenzy'.  We had homemade gelatine plates as well as the Gelli Arts plates, relief blocks, rubber stamps and lots of paint and paper.

Everyone had a lot of fun, experimenting with layering their relief prints over their monoprints created on the gelli plates.  A great day of play as well as a welcome relief from the hot day outside.

This is my promotional photo for the workshop, showing
one of my prints and equipment used.
Drawing and tracing designs onto the relief blocks.
Inspiration was gleaned from bird books and photographs.
Carving their blocks, a methodical but relaxing process.
Printing the relief blocks, using water based
block printing inks and a silver spoon as a baren.
Printing time!  Everyone was very keen to try out monoprinting
using the gelli plates.  The homemade gelatine plates
were also good to try to see the difference.
 
Some of Wendy's wonderful work, her Spangled Drongo block
had expressive line work balanced with positive and negative space.
The Magpie image was popular - a great design
for first timers!  This one is layered over a blue monoprint
from a gelli plate.
A gorgeous and creative use of a Magpie design on a card.
A beautiful carving by Sharyn, the attention to
detail makes the bird come to life.
Her design is based on a vintage woodcut, you
can really see that in her imagery.

Sunday, January 4, 2015

Experimenting with Printing & Dyeing

The Christmas/New Year period is my favourite time of year as it allows me a couple of weeks of relaxing slow time in my studio without having a set routine.   Of course I end up with a 'to do' list a mile long, which is really more of a wish list given I usually want to do a year's worth of art in a few days.

This year's big project was to give Lumi Printing a try.  Its something I spied at the art shop earlier in the year and I decided to treat myself as an early Christmas present.

The Lumi system is simply sun printing on fabric.  I had briefly experimented with sun printing a few years before, so seeing the Lumi products gave me the inspiration to try printing and eco-dyeing together.

I made transparencies of Bracken Ferns to expose with the Lumi dye on a couple of cheap white cotton t-shirts.  I painted the dye onto the shirts, then exposed them to the sun for 20 minutes with the transparencies on top.  Pretty simple to do on one of our clear, hot summer days.

After washing, I then prepared the t-shirts for eco-dyeing.  This time I pre-mordanted using a couple of dips in soy milk (organic, no added sugar).  I decided on a cabbage brew, aiming for soft blues and browns to compliment my fern prints.  HOWEVER as usual, my dye bath didn't go to plan, I ended up with a nasty dark brew which was more like an iron brew, so the results were much darker than I wanted.  The other problem is the smell - I've washed the shirts several times, there's still a bit of a residual odour but good enough to wear without turning people off.

In conclusion, I'd say it was a bit of holiday fun.  The results were not as I expected, but I've created some very unique artwork that I can wear.  My next experiment will be monoprinting on shirts with my etching press 'Thumper' instead of the Lumi dyes.

The Lumi Dye Products.
I bought a few small packets to give it a try.
One packet of dye did one A4 size area on a shirt.
Applying the Lumi dye.
Exposing the dye to sunlight to make the print.
The resulting prints.
Bundling after eco-dyeing.
I decided to try using a shibori fold instead of
rolling around a stick.
One of the finished t-shirts,
a combination of print and dye,
very organic looking.
Here I am modelling the other shirt.
 I think the colour of the print doesn't really sit well
with the accidental darks of the eco-print.
But I'm not too worried.  The cost of the whole process
was only about $15 per shirt
(including the cost of the shirt!).

With this singlet, I painted the Lumi dye on in a
random way then placed silky oak leaves on it before
exposing to sunlight.  A bit more of an abstract result.
The dye colour was black, but I watered it down a bit
so its more of a purple/blue.
And of course one of the best eco prints on the BACK
of the t-shirt!  I might chop the shirt up and collage it
onto something else...... always possibilities!